Saturday, July 23, 2011

Look Ma, no tutes!

One of the best ways I have found to actually get comfortable with using a  program is to just do it.  So, over the past two days I have been working on a couch and matching chair in order to get used to Blender.

Still not completely comfortable with the program, but I'm getting there, I think.

Two days of working when I get the chance and I have created a matching set of furniture - a couch and a chair (the coffee table was an afterthought).

Absolutely loving the amount of control you can get with Blender while modeling.  The mirror command is my friend.
Couch and Chair set

Still haven't quite figured out the texture and material abilities and I know I could have done better with them in this image, but again, my focus is getting used to the commands and modeling in what seems to be an alien interface for me.

The couch is UVmapped, and is actually the only object in the scene that I had taken the time to do.

Making the chair proved easy enough with the mirror command, the couch is an extrapolation of the chair.  The coffee table took about 5 minutes.

All said and done, I feel the models are fairly decent, although I am sure the geometry could be much better as there are plenty of areas that would make some people cringe.

In the next few days I am hoping to get a chance to use these in a Marvelous Designer scene, but only time will tell if I get the chance soon.

Tuesday, July 19, 2011

First real Blender model: The Final Result

UVmapped and textured the model today.

I have to admit, unwrapping in Blender is one of the easiest things I have done regarding 3D to this date.  It may be that I have done it so many times that it has finally just clicked, or maybe Blender is just really easy, I am not sure.

Anyway, one of the best things to come from this tutorial is the knowledge of cgtextures.com, a wonderful repository of royalty-free textures (requires a free membership).

I was able to find a workable metal and wood texture and create the texture map in GIMP with no issues at all.  Although, after applying the texture I did notice one small spot that could be improved.  Not going to fix it, lesson learned, will be more careful in the future.

So here it is rendered in Luxrender with textures applied:
Axe from Blender, textured


And again, with some lighting and a reflective surface:

Axe from Blender, textured and lit

Monday, July 18, 2011

First real Blender model

What I mean by 'real' model, is that it is not a mass of crazy extrusions, edge loops, scales and whatnot, it is an actual shape and form that is fairly recognizable.


Of course, I was vaguely following a tutorial on how to model it.  Believe me, without the tutorials for Blender I would never get the hang of the interface.  There are some major style differences between my axe and the one that you end up with if you follow the tutorial exactly, it was done on purpose...I want to learn how to model with Blender, not copy someone else's model.

So far, I am halfway done with the model and fairly satisfied with the way it has turned out so far.

Blender Axe
Now all that is left is mapping and texturing.  Will have to tackle that tomorrow.

I am also learning the Blender ropes at a decent enough pace - I believe anyway.

Seems that Blender is extremely powerful, or can be in the right hands.

All I have the time for tonight though, texturing tomorrow and then going to start another phase on Wednesday, not sure what though.

Thursday, July 14, 2011

DAZ|Studio vs Luxrender

This first pic is the DAZ|Studio render, the second is the scene exported to Luxrender using a free plugin.

Other than the lack of speed that luxrender produces the image, I am very pleased with the result overall.

DAZ|Studio Render
The scene was compiled in DAZ|Studio and exported to luxrender using tofusan's free plugin (found here, bottom of page).

Still need to get some practice in with it, obviously when you look at the windows and the glass on the car in the bottom picture.

The DAZ|Studio render took about 3 minutes using 2 lights.

The luxrender image...well, using 1 IBL light it only took about 16 hours.  The cool thing about luxrender though, is I can add render time to the file anytime I want and it will continue to improve.

Not to mention, the results look fantastic in comparison!
Luxrender

For the next week I will be doing all my 3D work in Blender.  This has been a long time coming, but now I actually have some motivation to do it.

Blender can be found at Blender.org and is 100% free.  Also, there are a veritable ton of tutorials out there for this all-inclusive program.

It only takes about 3 minutes to download and 2 minutes to install.  It's a good thing to, because the interface and commands will take you months to learn!

Wednesday, July 13, 2011

For those who may wonder...

Why is my mind my enemy?

Let me start with an example:

My last post was all about how I was learning how to rig clothing for 3D figures, mainly because conforming clothing is MUCH less resource-intensive than dynamics, although dynamics are much easier to setup.

Well, so much for that.  I've starting playing with Luxrender now and have completely discarded all thoughts of rigging clothing.  Additionally, I have found a way to use poser-rigged figures in 3dsMax (and as long as I go to school, I'll be able to continue using it).  3dsMax has a cloth sim...so conforming clothes are not required, it just means I have to do all my scene composition with "nekkid" figures and add the clothing last.

This all comes about while I am working on a d6 fantasy space-western tabletop RPG that I am running every-other weekend, playing guitar again, trying to keep my job, deciding on what clutter/old stuff I want to get rid of, keeping up with this blog, rendering fun stuff for myself (for deviantart gallery), modeling (because it is actually fun when the project is finished...and I have a lot of unfinished projects, lol) AND keep up with my family and friends.

But in my mind, when I see something I want to do, by golly I start doing it!  Finishing it has always been the hard part.

The programs I am just starting to mess with at this time consist of:  3dsMax, CADD, the rest of the AutoDesk suite (at least, whatever I can get to run on my computer) and Blender PLUS I'm still working with DAZ|Studio, Carrara and Hexagon at least until I find out if I like one of the others better.

LOTRO and DDO have pretty much been set on the back burner at another house, I have not been on DDO for about 2 months and LOTRO recieves about an hour or two a week of my attention.

So, if you follow this blog, just remember this post when I jump from topic to topic at random times  :)

Thursday, July 7, 2011

Conforming cloth vs Dynamic cloth

Conforming cloth:  cloth modeled for a particular figure that will bend with the figure through the use of rigging.  Pros:  load, conform, pose figure and that is all you need to do, Cons:  pain in the butt to setup for use.

Dynamic cloth:  cloth that uses software physics engine to collide in a semi-realistic way with items in the scene.  Pros:  model, load, simulate; Cons:  resource intensive, must setup up individually for each program, some programs (at the hobby level) do not have the capability for dynamic cloth OR said programs have a dynamic cloth engine but creation is held only by those that can afford extremely expensive software.

To demonstrate, I am using a dress that I made in a program that is wonderful for creating clothing.

There is only one dress object, and the only time I scaled it was to put it on the child figure, the child figure (fig1) is the only one I left in the 'zero' pose after adding the cloth object (the dress), the other figures were posed afterwards.
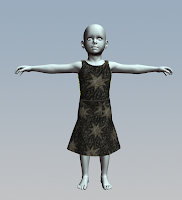
fig2

The process I followed worked this way:  I opened the program (Marvelous Designer) and loaded the dress that I had previously made then moved it to the correct height and placement of the default figure (fig2).  Simulated cloth, posed and took a snapshot.
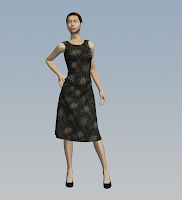
 Then I loaded DAZ's Stephanie4, moved the cloth for height and placement, simulated cloth, posed and saved the image (fig3).  If you notice, the dress is too big for her because it was modeled for DAZ's Victoria4 (fig4).  I did have to do some tugging here and there to get the neckline vaguely in place.


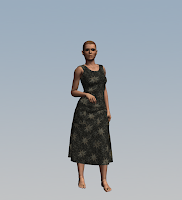
 Of course, that left Victoria4.  So I loaded her up, move for height and placement, simulated, posed and took a snapshot.


Notice the pattern?


fig2 
In order to do this with conforming cloth, I would have to take the same dress and create a skeleton for each model that the dress was going to be compatible with.  Of course, this would use a lot less of my resources and I would gain the benefit of being able to use the figures in more than one program.


As it is now among the 'hobby' programs Poser and Blender are the only two programs with a fully functional (meaning I can create and simulate the cloth object) cloth room.


fig3
DAZ|Studio, although it has dynamic cloth ability if you purchase the plugin, does not yet have a way for you to use your own dynamic cloth creations - everything you make has to be conforming.  Although they do sell plenty of dynamic items in the store (I do have to mention, this was not the original intent of DAZ, it was the method the dynamic cloth vendor decided to take).

So, why am I mentioning this?  Because, I have decided to attempt tackling conforming cloth again.


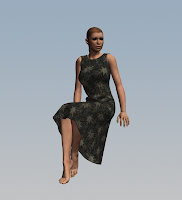
I added the Victoria4 image for another important difference, in order to get the dress to move to a sitting position, you have to add in deformers or morphs, extending the amount of time it is going to take you to produce a finished product.